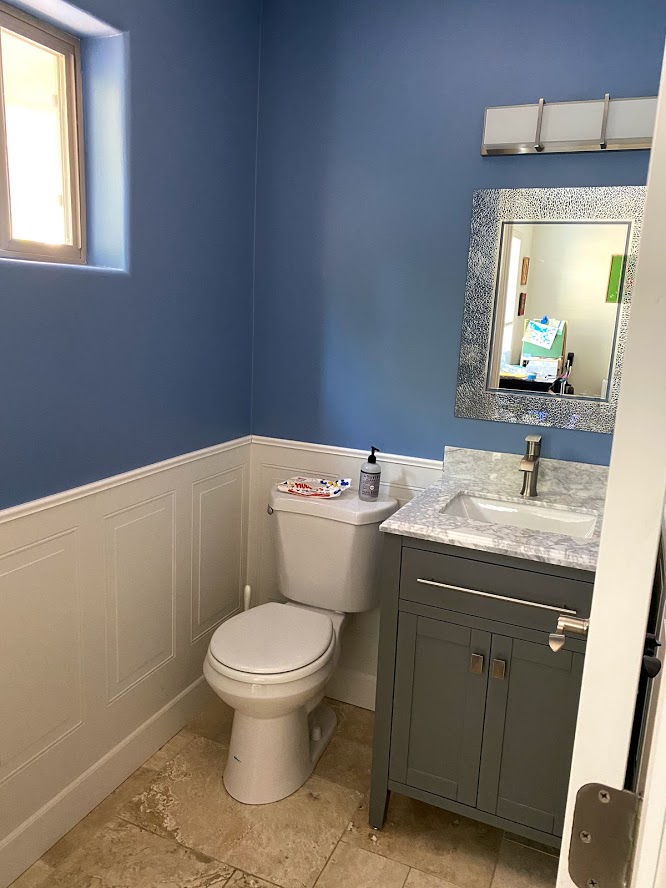
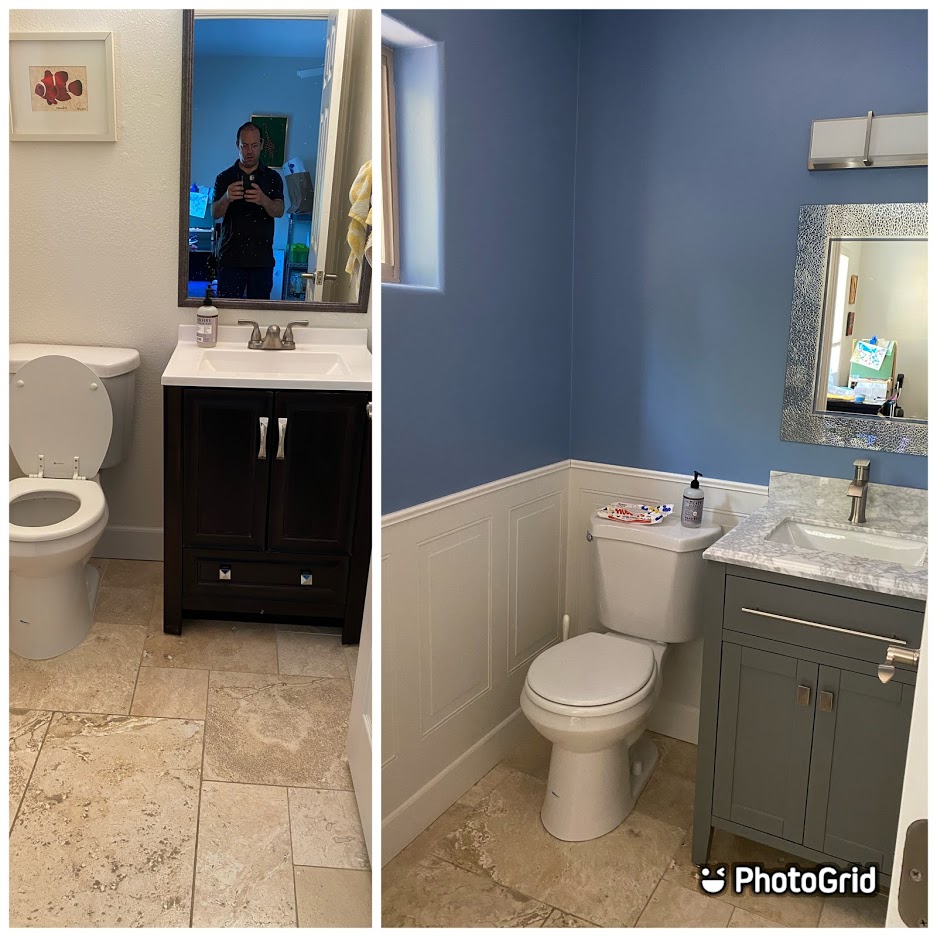
Small bathroom remodel
Do you have a bathroom or a room that you want to update and make it pop! Here is a small project we did, only took 3 days and it was fairly inexpensive. It can also be done by you or any decent handyman.
To be honest, this was all my wife’s idea. She has been dreaming of adding wainscoting to our walls and came up with the half bathroom remodel ideal. Her first stop was at our local Sherwin Williams paint shop. they have many brochures you can pick up for free, with loads of color pallets and some pictures of projects showing the color mix.
After settling on the colors it was time to choose the wall covering. We looked at different wainscoting designs and found the one that we both agreed on. We went with a simple but nice trim on top to give it the look we wanted. Next we searched our local stores for a deal on a vanity that will match the colors and look we were going for. In our case we found one at Building Material Outlet in Phoenix, Since it came with only one hole for the faucet, we stooped by our local Home Depot and picked up a one hole faucet. As for the mirror and light fixture, we found that the selection at Lowes was great and picked the two that matched our project.
Getting the Work Started
When it was time for doing the labor part, we set aside 3 days. I own Response Crew Handyman so I decided to use one of my techs for the project but here I will explain what I did, and what you can do to save time and money.
First, clear out the room, remove the toilet, vanity and any hardware from the walls. If you room is dark you should keep the light fixture for a day or two as you might need the light. Option here is to smooth the walls, my walls are textured and part of the new look would be a more modern smooth wall, if drywall is not your thing you can skip this, the process took 1.5 days, two coats of 20 minute mud and 1 coat of box mud (Ultra). Sanding the dry mud is a bit of a messy process, make sure to keep the door closed with a fan running. Also, cover all the furniture in the room next to where you are working.
If you decide to skip the smooth walls, paint the walls, you don’t need to go all the way down, remember your wall covering will take care of 1/3 of the bottom portion of the wall. Start with your cut-ins and roll the rest. 2 coats worked real well for me.
Installing the Wainscoting
To install the wainscoting I decided to use cement adhesive, you apply to each side (wall and product) and put it right on the wall. Before you do this, make sure to dry fit all the pieces. I started with the first corner you see when you walk into the room, keeping all the cuts to the corners you see less. Once all the pieces are cut, you can paint the wainscoting.
My next step was to reinstall the toilet and vanity with the plumbing. After that it was the trim that sits on the wall cover. I glued that as well. caulk and touch up paint gets that part of the job done nicely. All that is left is a new light fixture and mirror.
Materials
- Paint – Sherwin Williams 2 gallon are $25 each. You can save some money, if you buy Behr at Home Depot (around $17 per gallon)
- Wainscoting – 3×4 was $17 each panel, I ended up needing 5 pieces.
- Trim – Approximately $1 per foot. We used a total of 15 feet.
- If you decide to smooth the walls, that would cost around $60 in material.
- As for the vanity, this is optional, I found used but good condition boxes for $125-$250 and new for around $500. This is your project and your budget.
- Faucet was $109 before tax.
- Mirror and light fixture came out to be around $120
Total material can be as low as $400, if you shop right and maybe even lower if you can reuse your vanity and faucet.